Author Archives: Tammy Falloon

choose christmas tree

HOW TO CHOOSE A REAL CHRISTMAS TREE

Learn how to choose the perfect Christmas tree for your home with our helpful tips. We offer various trees for different budgets, including real cut, pot-grown, or artificial options. Starting from the 25th of November, our freshly cut Christmas trees will be available for purchase.

Don’t forget to use your coupon to enjoy £5 off any tree, real or artificial, that you purchase from us!

Preparation – measure up

Before leaving home to get your Christmas tree, measure your space and check your tree stand. Everyone gets tempted by a big tree only to get home and find it can’t fit through the door or stand up straight! It is also important to measure the width/diameter of your space.

Once you know what size you need, the next step is deciding what look or feel you want by understanding the different varieties available. Here is a list of the varieties we will be selling this Christmas.

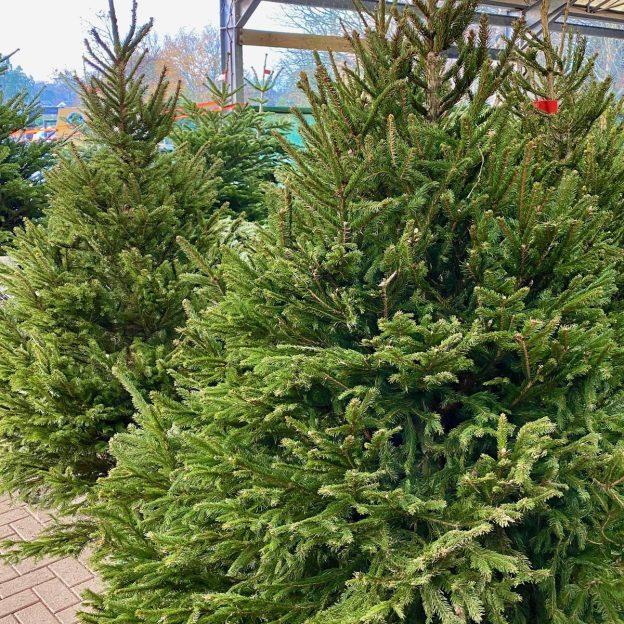
We will have four types to choose from:

Nordmann Fir

This is the nation’s favourite Christmas Tree because of their excellent needle holding properties. They have deep green, soft needles and are very bushy. We only stock premium deluxe grade trees which means that the stem is straight and located in the very centre of the tree. Their width will be less than the tree’s height yet wider than its halfway point and the branches will be spread evenly in near-perfect symmetry!

Our Nordmann Firs are available from 4ft to 9ft tall.

The Fraser Fir

The Fraser Fir is a brilliant alternative to the Nordmann and it is particularly attractive thanks to its unrivalled needle retention. Slimmer and more conical in shape than the Nordmann, the Fraser has thick and compact branches and sometimes a less straight, marginally twisted leader (top branch). The smaller softer needles give off a citrus scent. This is the perfect choice for smaller spaces.

We will have cut Fraser Firs in 4ft and 6ft heights.

The Norway Spruce

This is the traditional Christmas Tree with a festive pine scent, and it is perfect for outdoor displays. The Norway Spruce is the cheapest tree to buy but we do advise leaving it stood outside for as long as possible as it is the worst for needle retention when placed indoors. Definitely keep it away from any heat source and keep the water reservoir in your container topped up daily. The needles can be quite sharp so it’s not a great choice if you have young children.

Our Norway Spruce trees are again Premium grade, so they have been pruned or sheared to give the picture-perfect Christmas tree shape.

We will have cut Norway Spruce trees from 5ft to 8ft heights.

The Blue Spruce

New to us this year as a cut tree is the Blue Spruce. It shines silvery blue to fresh green and whilst it has shaper needles than the Norway Spruce, this variety boasts better needle retention. With a delectable scent, this is a stunning alternative if you are looking for something different this year.

We will have 5ft tall cut Blue Spruce available.

Getting your tree home

Now you know what size and what type of tree you want, visit us to choose your tree. We drill a small hole in the middle of all our 4-6ft tall trees so that we can display them on pins. This means that it is like walking through a forest and you get to see the tree as it would be in your home (standing up). Our staff are on hand to help lift the trees off their perches and spin them around for you.

Once you are happy you have chosen the perfect tree we can then net the tree for you if you prefer. Netting is useful to make the tree narrower for getting home, the tree slides through the netting machine from the base so the branches are gently pushed upwards. We find it is easier to get your tree in its stand whilst it is still netted as that way you can get it straight without poking your eye on the branches! Once in position, fill the water reservoir on your container and then cut the netting off by cutting straight from the base to the top of your tree.

If you are not going to decorate your tree immediately, the cut the netting off and keep the tree stood up in a bucket outside. The longer you keep your tree outside the better as it will keep your tree fresher.

All you have to do now is decorate and we’ve got a lovely selection of lights and decorations awaiting your visit.


seed potatoes

SEED POTATOES

Ever fancied eating your own home grown spuds and not sure how to do it? Wondered why you should are supposed to buy seed potatoes rather than plant your supermarket ones? Well let us shed some light for you…

Why shouldn’t you plant supermarket potatoes?

Your average potato from the supermarket will grow into a potato plant when planted. But it is far better to buy seed potatoes from a garden centre as they will be certified disease free. Seed potatoes were grown to be replanted. These tubers are supplied to you with the intention to grow more from them. They have been certified as disease free and the growers are inspected and their potatoes have a ‘plant licence’. This means that they reduce the risk of crop disease and soil damage. Whilst supermarket potatoes are perfectly fine for us when cooked, when planted they can introduce long-lasting disease to your soil (think Irish potato famine).

Another benefit of seed potatoes is that they are meant to produce high yields and quality plants.

What variety should I choose?

If you are new to growing potatoes, look on our handy labels for varieties that are easy to grow. A small 1kg taster bag is a good place to start and will give you a decent crop. You may want to choose two or three different varieties to extend your cropping period.

Finally, make sure you buy varieties that suit your cooking! Some varieties chip and roast well while others are better for boiling and mashing.

Remember our staff are always pleased to help you and will gladly advise on your selection.

I’ve heard that some potatoes are earlier than others

Potatoes are classified into three groups…

First Early Varieties – These potato varieties will give you the first harvest of new potatoes of the summer. Think small salad potatoes.

Second Early Varieties – Second earlies will be ready to harvest just after the first earlies, approximately 2 weeks down the line.

Maincrop Varieties – Maincrop potatoes are the ones you leave to mature, so you can lift them at the end of the season and store them for use during winter. Think crispy roasties with your Christmas meal.

Think about where are you going to grow the potatoes. Maincrop potatoes tend to take up a fair amount of space so if you have an allotment or large plot these are perfect. If, however, you are short of space and would rather grow potatoes in a container or potato grow bag then look out for first or second earlies. Equally if you want to harvest your crop in summer when they tend to be expensive in the shops, buy first earlies.

Seed potatoes won’t store until next year so only buy what you intend to plant this year.

Chitting!

Before you plant your potatoes we recommend you chit them (please note spelling – we are not being rude)! February is the best time to start chitting potatoes, which basically is encouraging them to sprout before planting. This makes them grow quicker and leads to a bumper harvest.

If you have only a few potato tubers, line them up in egg cartons. If you’re doing lots of chitting, put them  in open boxes with something like bubble wrap or newspaper in between to keep them upright. Place your box in a naturally light place slightly warm like a porch or unheated greenhouse.

Keep an eye on your potatoes, you need to wait for strong, short green shoots to appear (usually in 4-6 weeks) that are about 2-3 cms long from the eyes of each tuber. If you want to maximize the size of your potatoes when they crop, rub off all but three or four at the top end of the tuber before planting out. If you leave all the shoots intact you’ll end up with lots of smaller potatoes.

Now simply follow the instructions on your packet and plant your potatoes. Good luck!


Pippa Greenwood visits our garden centre

Pippa Greenwood visits our garden centre

We were delighted to welcome Pippa Greenwood to our garden centre this spring. Pippa was visiting us in her capacity as Horticultural Manager with the HTA (Horticultural Trade Association).

Pippa Greenwood trained in plant pathology and is famed for appearing on the BBC’s Gardeners World as well as being a regular panellist on Gardener’s Question Time on BBC Radio 4.

Many of our staff were itching to meet their gardening idol; who spent a pleasant time in our cafe and viewing our own nursery grown plants in the plant area. Pippa’s passion for gardening and support for British horticulture oozes out of her and we thoroughly enjoyed discussing new initiatives and challenges that face the industry as a whole.

Part of our Houseplant Section

Houseplant care in winter

We’ve had a lot of questions about looking after houseplants at this time of year (January).

Lighting

Firstly you need to make sure your houseplants are in the right position, receiving the right amount of light and within the correct temperature range. Nearly all houseplants come with care labels that provide this kind of information, but if you’re still not sure just ask one of our plant staff when you next visit or buy a houseplant book from our book department.  As a general rule most houseplants do not like direct sunlight (as it can scorch their leaves) but most need some sunlight! Because we have less sunlight hours and a ‘weaker’ sun in winter, you may need to re-position your houseplants as we move into spring and summer.

Watering

The main cause of “houseplant death” is overwatering. If you’re not sure how much to water, it’s better to err on the dry side rather than give your plants too much water.

With all houseplants, a little bit of research goes a long way and the more you know about the plant you have the better your watering will be as by understanding where the plant grows naturally you can try and recreate those growing conditions. Cacti and succulents for example come from hot dry climates so you water them less. Some plants that come from tropical climates will benefit from increased humidity, so by placing them in a saucer filled with chippings and water you will increase the humidity around the plant. As a general rule of thumb for plants in a free draining soil you want to water when the pot feels light to lift and when the top inch of soil feels dry when you stick a finger in.

Feeding

During the winter you shouldn’t need to feed your houseplants. Feeding is best during spring and summer. We sell lots of specialist feeds in our garden centre so we are certain we have the right one for your plants but if you have a variety of plants it is best to get an ‘all round’ feed. We recommend wither Baby Bio Plant food or Houseplant Focus Liquid feed. Both products are available as a concentrate you dilute with water or as a drip feeder which you can insert into your plant pots.

Re-potting

If you have owned your plant for sometime now, take a few seconds to look at it’s roots. Give the plastic pot your plant will have come in a gentle squeeze to loosen it and gently pull it away from the plant. If your plant roots are swirling around creating a compact root ball that is binding all the soil together; then you need to re pot it.

choose a pot that is one to two sizes larger than the post you already have as it is better for the plant to gradually increase the size of its root ball and should lead to a stronger, healthier houseplant. The size of a pot is usually marked on the bottom and will either be in cm or litres. If in doubt measure the diameter at the top  and the pot depth.

You will need a general houseplant repotting mix to complete the job.

Repotting is best completed in the spring but you can get your pot and compost now ready for when you repot in March.

Remove dust

We expect you keep a beautiful dust free house but whilst most of us give the odd dust to surfaces, houseplants tend to get forgotten. Yet houseplant leaves are surfaces too and they can get clogged!

You can either put your plants in the shower and gives them a gentle wash or for plants with smooth leaves use a cloth and gently wipe from stem to leaf tip. For hairy leaved plants, use a soft brush (like a paint brush) to brush the dust off. Your plant will look better and it will also be able to soak up more light.

Deadhead

When a flower has finished and started to shrivel, remove the stem from your plant to encourage more blooms to develop and help prevent disease problems. You can get scissors called snips just for the job or you can use any sharp scissors (just make sure they are clean).

Watch out for pests

There are a few common pests that can attack houseplants from time to time. The main culprits are red spider mite, mealybug, aphids, fungus gnats and scale insects.

There are several options for each type of pest but for all pests prevention is better than cure so providing you take good care of your plants, pests should stay away. However if you need to control pests there are either non-organic solutions (pesticides) or organic solutions. We have both options available to you in our shop so please tell us what you a problem with and we will find a solution. A good first step though is to remove as many culprits as possible through washing them off or crushing them between your fingers. A mild mix of washing up liquid and water creates a good wash.

Want to know more?

Our garden centre has a lot of helpful books on houseplants and their care and our staff will be pleased to assist you and offer advice in person, click here for our opening hours. 
If you want to read more online, we recommend referring to the Royal Horticultural Society.

How to plant a hanging basket

The low down on the high up – hanging baskets!

Hanging baskets are a fail-safe way to bring bursts of colour to an otherwise dull wall, or a perfect way to incorporate flowers and greenery when you are pushed for space. With the help of a greenhouse, April is the best time to start planting a hanging basket so that it has reached full flower coverage by the summer months. If you won’t be able to use a greenhouse, it may be best to hold off a little while or cover your basket with horticultural fleece when there is a risk of frost.

How to plant a hanging basket

  1. Choose your basket; we have a large range of baskets in store, which range in shape, size, lining and price.
  2. Chose your plants (read ahead to get a feel for the right kind of plants), buy them and make sure that they are well watered before planting.
  3. Unhook the basket’s chain and line the basket. Lining is a personal preference; we have some amazing natural linings in store made from recycled plant fibres, alternatively a thick layer of moss would also work. Make sure the lining fits the basket nicely and cut off any material above the rim of the basket.
  4. Place a saucer at the bottom of the basket after lining all over; this will help to retain moisture.
  5. Before filling the basket with compost, if you have chosen a solid lining make sure to slash some holes /slits appropriately around the basket in order to push the trailing plants through to cover the sides of the basket (if the basket is deep enough you may be able to fit two layers of these). Once you have done this you can half fill the basket with compost (until the compost is level with the first set of slits, we recommend using John Innes no 2 which can be purchased from both of our stores) or a moisture retaining compost like the one from Miracle Gro.
  6. Next plant the trailing plants. These should be planted from the inside outwards to protect the roots, settling them so that the root ball is laying on top of the compost and the foliage is outside of the basket. For the trailing plants we recommend you move around the basket alternating between foliage plants like helichrysums and trailing flowering plants like petunias.
  7. Once all of the slits have been filled, tease out the roots of the plants and add more compost to work around the roots, almost filling the basket. More trailing plants can be planted around the rim of the basket; maybe try geraniums or lobelias.
  8. Now that preparation for the sides of the basket is complete, you can move onto the centre. What you plant here is completely optional depending on the style and colours you are aiming for. Whichever flowers you chose, you should angle them outwards to create the effect of layering.
  9. Make sure any gaps left over are filled with compost.
  10. Water your basket thoroughly and stand it in your greenhouse to grow. Without a greenhouse either delay planting for a few more weeks, or protect from frost.

Basket and pot bedding plants are now available from our garden centre (Sidmouth Road, Clyst St Mary, Exeter, EX5 1AE).

Get the best from your plants with the right fertiliser

Time to feed…trees & shrubs

March is the best time to feed trees, shrubs and hedges with a balanced fertiliser (such as growmore or blood, fish and bone). This is because your trees and shrubs will be emerging from their winter dormant period.

What are fertilisers

Fertilisers are a concentrated source of plant nutrients in chemical or organic form. Some also contain trace elements, which plants only need in tiny amounts.

Most fertilisers are based on the three major plant nutrients:
Nitrogen (N): For green leafy growth
Phosphorus (P): For healthy root and shoot growth
Potassium (K): For flowering, fruiting and general hardiness

If you look on any packet of fertiliser they should quote their N:P:K ratio. For example, a ratio of 7:7:7 indicates a balanced fertiliser (Vitax Growmore), but a ratio of 5:5:10 would indicate a high potassium fertiliser (in this case Vitax Rose Food).

What type of fertiliser should I use?

Fertilisers will either be organic (derived from plant or animal) or inorganic (man-made).

Organic fertilisers: contain plant nutrients in organic form. They tend to be slower acting, as large organic molecules have to be broken down by soil organisms before the nutrients within them are released for plant use. However, organic fertilisers are a “traditional” choice and whilst they have been used for hundreds of years they still remain popular due to their results.  Dried blood, fish blood & bone, seaweed extract, bone meal and poultry manure pellets are all example of this type of fertiliser.

Inorganic fertilisers: are synthetic, artificial forms of plant nutrients. They are usually more concentrated and faster acting than organic fertilisers. Examples include modern brands such as Miracle-Gro, Phostrogen, Tomorite as well as Growmore, Sulphate of Ammonia, Sulphate of Potash and Superphosphate

Within each category (organic or inorganic) there are further options…

Slow release fertilisers: These degrade slowly, usually under the influence of soil micro-organisms to release their nutrients. These are best used when the soil is warm as that will speed up the leaching of the nutrients into the soil. An example is bone meal.

Compound fertilisers: These contain a mixture of different nutrients, and may be balanced (containing similar proportions of all the major plant nutrients) or may supply more of some nutrients than others, as per the requirements of different crops. They may be organic or inorganic, or contain both. Most fertilisers labelled ‘all purpose’ will be a compound fertiliser.

Straight fertilisers: These contain only one or mainly one nutrient. They are usually used to provide different nutrients at different times of the year, or to correct particular nutrient deficiency. You can find these altogether in our specialist fertiliser area.

Controlled release fertilisers: These are almost always granules of inorganic fertilisers coated with a porous material such as sulphur or synthetic resin. Water enters the granule and the fertilisers leach out into the surrounding soil. The warmer the soil, the faster the leaching; this corresponds to plant growth which is faster in warm weather. By varying the thickness of the coating granules can be designed to feed plants for different periods of time. These are useful in baskets and containers where the access to soil nutrients is limited to that basket volume of compost.

How do I apply the fertiliser?

Always read the label of any fertiliser before you use it and wear gardening gloves if you intend to handle it. Follow the directions on the packet but assuming you go for grow more or blood, fish and bone we recommend you sprinkle the fertiliser over the root area before hoeing it into the top layer of the soil surface. This will particularly benefit young, weak, damaged or heavily pruned plants.

For help selecting the right fertiliser for your plants just ask one of our team when you next visit us.

March Focus on Pots & Containers – Entrances

Pots and Containers – ideas to bring your “space” to life

It isn’t a myth; gardens are getting smaller and for many of us, they’re so small it’s hard to know what to do, where to start, what to use and indeed how to create our own little sanctuary.

Sometimes it’s best to think about it practically…how much space do you have, how do you want to use it and how much time can you lend it. Some of us have only a small patio or balcony, some of us have nothing more than a few steps and some of us may be looking to turn a little corner into a little haven. Pots and containers can allow us to make it happen with relative ease.

Maybe you want perfume rather than colour, maybe you want a theme of gentle colours that are kind on the eye, maybe you want some bold, stunning, contemporary plants that offer structure. Perhaps your interest is only structural, framing an entrance or softening a gate or perhaps you are looking to make a display that’s main attribute is to attract bees and butterflies. There are so many options.

Our garden centre (on the Sidmouth Road at Clyst St Mary, postcode EX5 1AE) offers a vast collection of pots and containers of different styles and materials or you may want to simply make your own…convert an old bucket or trough into a planter, up-cycle something wonderful from some old wood; the possibilities are endless and can be a lot of fun.

Make an entrance

The key thing to consider is the architecture of your home for this will be the back drop to your planting. Is it stone or brick or tile or render? Is it grand? Is it classical or is it rustic? What colour is it? What size is it? Think through all of these questions so as to help you make the right decisions. Your aim should be to select your pots based on proportions and style. Sometimes the most attractive are the most simple, the most stunning are the most bold and the most beautiful are the those that have a boutique and bespoke style.

For many, the geometry of the entrance determines the decor you place in front of it. Cubes or urns containing topiary of bay or buxus are always strong favourites, something formal is the preferred choice for many. Conversely there are lots of properties where ‘geometry’ simply doesn’t sway it! For these you may prefer a more loose or casual array of assorted pots with a variety of aromatic and tumbling plants to spill a welcoming hello eg lavenders in terracotta with hostas and daisies and diascia, geraniums and grasses, herbs with scabiosa and sedum.

Give it a go

Very importantly you just need to have the confidence to give it a go, to show your inner creative self and make it extraordinarily yours! If you want aromatic go for it, if you want edible go for it, if you want gentle and calm go for it or if you want big and bold statement with a zillion colours or simply every shade of green, GO FOR IT.

You’ll need some compost, you’ll need a watering can and you’ll need a few minutes each week to give you a welcome home every day. Go on, GO FOR IT.


Seedling pushing up through compost

Gardening this February – time to think about about the ‘To Do List’

Time to think about the ‘To Do List’

Preparation, preparation, preparation… they key to success.

We are beginning to see genuine glimpse of Spring, while inevitably feeling the occasional chill and remnants of winter – there are still some frosts on high ground and hat and scarf winds along the coast.

Bulbs are pushing through, snowdrops are abundant and hints of colour are teasing their way into view. Additionally we are welcoming the longer, lighter evenings and the skies are bringing us more sunshine.

February is the perfect time to begin the process of preparing many parts of your garden, not least your greenhouse. 

Here are some February Tips: 

  • February is the time to prepare your greenhouse for spring by improving the ventilation, shading and heating. Think about installing an automatic vent opener. These are simple to fit and work on a simple piston. Inside the piston there is oil. When temperatures rise the oil expands and pushes the piston lever up, thus opening your roof vent. Netting and bubble wrap can easily be clipped to the metal down posts of your greenhouse using clips that we sell in the garden centre.
  • February is tidy up the greenhouse time. Get rid of any broken pots, old compost or debris that could hide unwanted visitors. Give it a good sweep out and consider using a greenhouse disinfectant to ensure you have a disease free home for your new plants.
  • February is round 2 of sowing winter salad in the greenhouse, conservatory or on a sunny windowsill, winter lettuce is a good choice.
  • February is the time to move any potted strawberry plants under cover to encourage early fruiting.
  • February is the time to check (again) your overwintering plants for aphids, mealy bugs and other pests, and take action where necessary.
  • February is the time to re-visit any potted peaches you may have brought into the greenhouse to avoid leaf curl disease.
  • February is perfect to sow seeds of colourful hardy annuals, such as Cornflowers, California Poppies, Larkspur, Love in the Mist and Borage. Use modular trays for early flowering.
  • February is the time to repot any Phalenopsis (Moth Orchids) if they look like they’re about to burst out of their pot and have finished flowering. We sell clear orchid pots in our garden centre which are vital to orchid success as they like their roots to see the light!

Here’s to your busy weekend of gardening… enjoy

Creating a bulb lasagne this November

In order to attain an abundance of flowering plants next sprint, have a go at making  bulb lasagne this November.

This easy and effective technique utilises the different planting depths required by bulbs enabling you to grow a punch of colour in one small space.

This technique is fabulously easy and can be achieved in plant pots as well as in the garden, giving you greater scope to spread some colour throughout your outdoor space.

Here are some handy tips to help you create your own bulb lasagne…

Begin by layering the bottom of your pot with pottery shards (crocks) or pebbles to keep the drainage holes in the bottom of your plant pot from becoming clogged with compost. This allows any water to pass through easily without water-logging your planters. Choose a bulb fibre or multi-purpose compost and scatter a layer of this compost on top of the crocks.

Always plant the largest flowering bulbs first at the deepest layer, moving upwards in size to the smallest on the top. Typically, a bulb lasagne will have daffodils at the bottom, tulips in the middle and crocus at the top.

There’s no need to worry about the bulbs that are planted deep at the lowest level, they will grow and surface naturally moving around anything in their way.

When making your bulb lasagne, the bulbs will need to be planted a little further apart than you would if you were planting a single layer, approx 1.5 inches apart is about right and if you’re planting in pots, try to arrange your bulbs so that they don’t touch each other or the sides of the pot.

Follow the planting depth instructions on your packets of bulbs and add a 2 inch layer of compost after each bulb layer.

When making your bulb lasagne get creative and bold, you can make two or even three layers of bulbs if you wish and with a large choice of flowering plants to choose from you can have fun concocting your own ingredients. Here are some suggestions: Tulips, daffodils, lilies, hyacinths, snowdrops, crocus, scillas, anemones, iris etc, all of which we have in store.

Remember if you are planting in pots, drainage is key to prevent your bulbs from rotting and make sure you position your pots before filling them as they will become heavy and difficult to move once filled and watered.

Once you have planted your bulbs, water right away and regularly for the first few weeks whilst the roots are forming and make sure that the compost doesn’t dry out.

If you’re planting spring bulbs you may well need to protect and insulate your pots from severe cold conditions. The simplest way to do this is to wrap your pots in bubble wrap or plant fleece to protect them from frost and snow.

Whatever you decide to grow, we hope you have fun creating your bulb lasagne and enjoy the onset of colour from next spring.


Happy gardening everyone!